Xamarin Forms - Selecting an Image from the Gallery
Xamarin Forms
Selecting a picture from the Gallery
Selecting an image from the gallery, or taking a picture with the device's camera is something that is very often used in mobile applications, and of course, your Xamarin Forms apps are often going to require this functionality, so this post will guide you through the steps necessary to implement this on a Xamarin Forms application for both Android and iOS.
1. Preparing the project
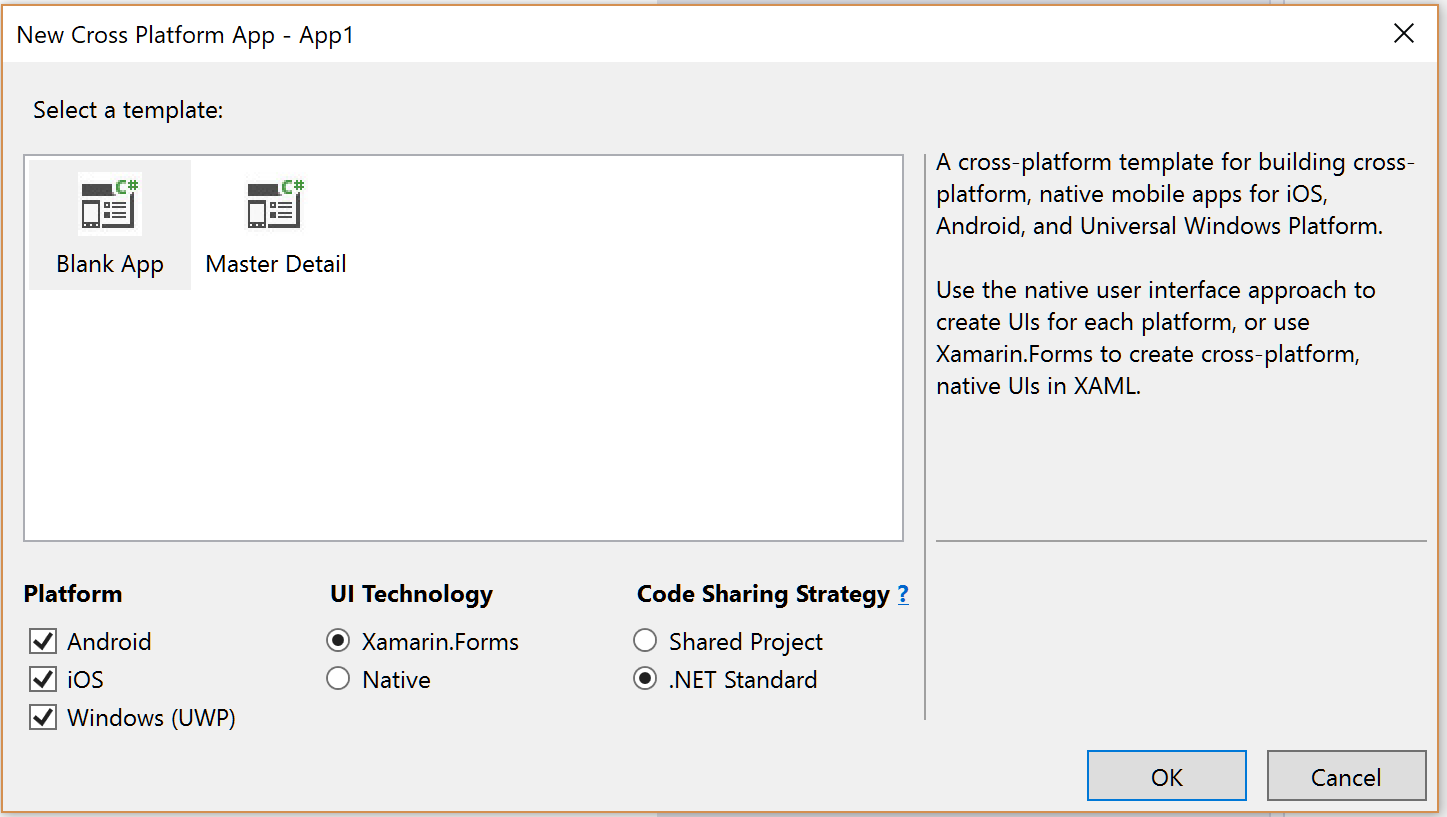
The first step is of course to create a Xamarin Forms project on either Visual Studio 2017 or Visual Studio for Mac, I am going to be using Visual Studio for Mac for this post. If you are not familiar with the process of creating a project, simply open Visual Studio, select the option to create a new project, and find the Cross-Platform option. There you will have to select Cross-Platform App (Xamarin.Forms), set a name, and in the next Window, select Blank App, the platforms that you want to support, Xamarin.Forms as the UI Technology, and .NET Standard as the Code Sharing Strategy.
The selections needed when creating a Xamarin Forms project in Visual Studio 2017 (Windows)
The selections needed when creating a Xamarin Forms project in Visual Studio for Mac
In the case of Visual Studio for Mac the steps are similar, you select the option to create a new project, and under the Multiplatform>App section, select "Blank Forms App". In the next window make sure you set the name for the project, select the target platforms, select Use Portable Class Library as the Code Sharing Strategy, and select "Use XAML for user interface files".
Now that the project is created, you will need to add James Montemagno's Media Plugin to the shared projects, in Visual Studio 2017 you can simply right-click on the solution and select "Manage NuGet Packages for Solution", in Visual Studio for Mac you will need to go to each of the projects, right-click on their Packages folder, and select "Add packages".
On either IDE, simply search for "Media.Plugin" in the window that is opened when you select the corresponding option mentioned above, select the package and install it. On Visual Studio 2017, here is where you can select all the projects so the package is installed on all of them.
The package with the functionality to select/take pictures from the shared code of a Xamarin Forms app
2. Defining the layout
The purpose of this post is not to get into the steps required to create a shared XAML interface for both Android and iOS, but here is the code I used to add a button to the title bar, as well as an Image that will eventually hold the selected image.
The layout described to the right, running on an iPhone X
<ContentPage xmlns="http://xamarin.com/schemas/2014/forms" xmlns:x="http://schemas.microsoft.com/winfx/2009/xaml" xmlns:local="clr-namespace:ImageUploader" x:Class="ImageUploader.ImageUploaderPage"> <ContentPage.ToolbarItems> <ToolbarItem Text="Select" Clicked="Handle_Clicked"/> </ContentPage.ToolbarItems> <ContentPage.Content> <Image x:Name="selectedImage"/> </ContentPage.Content> </ContentPage>
For the Toolbar to be displayed, you will need to set a NavigationPage as the MainPage for the App class, simply navigate to the App.xaml.cs file and change the constructor, just a little bit so that it now looks like this:
public App()
{
    InitializeComponent();

    MainPage = new NavigationPage(new ImageUploaderPage());
}
Notice the event handler for the Clicked event of the ToolbarItem, this one is important, there is where the action will happen. In case you are curious, the image to the left represents the result of this XAML code running on an iPhone X. Notice that the button is on the top right corner, that is the button the user will have to press to select the image.
The event handler for this button then, will implement the following functionality.
3. The Functionality
Using the CrossMedia Plugin by James Montemagno really makes this very easy, but there are still a few things that you should consider. First, you will need to mark your method as asynchronous, since selecting a picture from the gallery (or taking one for that matter) can take a while, and we will have to "wait" for a method to actually return the image before being able to work with the image itself (obvious right?). You will also need to call the Initialize method from the CrossMedia class to establish the communication between the native project and the Media Plugin.
After this, the next thing you need to do is make sure that the current device supports the operation that you want to perform, either taking pictures or selecting images from the gallery, if not, it's a good idea to communicate that to the user, and return away from the method, so nothing gets executed.
Now that you are certain that the operation is available, you can execute that operation, optionally you can create some media options, like in this case, I am creating a media options so the size of the selected image is resized as medium, so it is not too big, since in the next post, I will be uploading it to the cloud.
With that selected file, which now contains the selected image (or the one that was taken) you can now assign it to the image that we defined earlier in XAML by calling the FromStream method. It is always a good idea to check if this selectedImageFile is not null before trying to use it.
Finally, you will need to establish some permission for your iOS app's Info.plist file, so the app gets access to the pictures. On Windows, expand the iOS project, right-click on the Info.plist file and select "open with" to later select "Generic PList Editor". On macOS, simply double-click and navigate to the Source tab (from the bottom of the window).
All the way to the bottom of the List, on both IDEs, you will find a plus button. If you select it, a new value will be added, a "Custom Property", but if you select it, a drop-down menu is activated, expand it and select "Privacy - Photo Library Usage Description". This value is necessary since iOS will help us ask the user permission to access the gallery, and a message, usually describing why we need that permission will be displayed. That message is the value that we need to set to the selected permission:
And that's it, you can now test your application, click on the button, select an image, and see it being displayed inside your app. Notice that on iOS, the message that you wrote on the permission is displayed. On Android, by the way, you may need to first launch the camera app and take some pictures of the simulated camera, so there are actual pictures to select from.
In case you want it, here is the source code from this post.
This post is part of my Complete Xamarin Developer Course, which contains 28+ hours of high-quality content and 8,000+ students.


