

Xamarin Forms Maps - Android

Maps in Xamairn Forms
iOS edition
If your application is going to have a big focus on Maps, and a lot of its functionality relies on displaying information inside them, I would recommend using Xamarin native to build that app, however, if you only need to use map slightly, to display some information here and there, but the main functionality of your app is something else, and pixel-perfect accuracy for the maps is not vital, there is a way of how to use Maps on a Xamarin Forms app.
In this post, I will focus on getting the maps ready on Android, but keep in mind that the code used to display this will work on both iOS and Android (it's just that preparing the iOS project to display maps was covered in the previous post).
All the code for this post is in this repository, I encourage you to fork it and make any changes you may need.
Preparing the Android project
In the previous post I prepared the iOS project, but after this section, I will talk about the shared part of defining a map in XAML (although that was also part of the previous).
Anyways, the first step is to add a reference to a NuGet Package to both the Android and the PCL (or .NET Standard) projects. The package that you will need to add is the Xamarin.Forms.Maps package:

Don't forget this package reference needs to be added to both the shared library project and the Android project. In the case of Android, along with the Forms Maps package, there will be some other packages that are added related to Google Play Services, through them is that the app will be able to display Google Maps inside the UI.
Now that the package is referenced, you will have access to the FormsMaps class, that will be the one tasked with initializing the maps on Android, similar to how Xamarin Forms is initialized. Navigate to the MainActivity class, inside the Android project, where you will find the OnCreate method. Here, and right below the Init method call from the Forms class, another Init method must be called:
Xamarin.FormsMaps.Init(this, bundle);
Notice that different to the call in iOS, this requires the same parameters as the other Init method that are being received by the OnCreate.
While in the case of iOS, this is pretty much everything that is needed to display maps, in the case of Android we will need a Google Maps API key that is crucial for the map to be displayed, otherwise, the app will only display a gray box.
Getting the Google Maps API Key
To get this key you will need to navigate to console.developers.google.com and create a new application by clicking on the top left drop-down menu (or clicking on the "create project" button that appears when you haven't created any projects before.
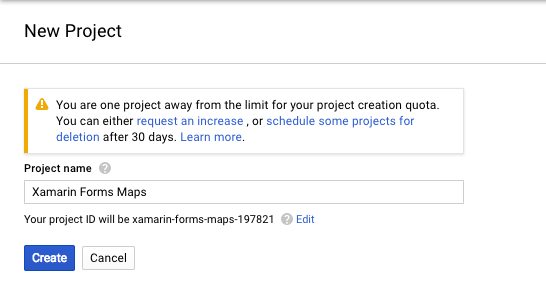
Once the new project has been created you will be navigated to a page like this. Make sure that in the top left corner's drop-down, the new project is selected, sometimes this selection doesn't automatically change to the new project.

Once the project has been created and you are able to navigate to its Dashboard, click on the "Enable APIs and services" button. You will be redirected to a huge list of APIs that you can enable for your app. The one you have to enable is in the Maps section and is called Google Maps Android API. Click on it and then select enable.

Once you have enabled this API, to the left you will be able to navigate to the Credentials tab and select "create credentials", which will create the API key that we need. copy the generated API key and head back to Visual Studio.

Back in Visual Studio, you will need to paste this API key inside the Android Manifest file. You can find this file inside the Android project and inside the Source folder. To the bottom, you will find the Source tab, select it and define, inside the application tag, some new meta-data that will contain that API key that you just copied.
<application android:label="Maps">
    <meta-data android:name="com.google.android.geo.API_KEY" android:value="YOUR_API_KEY"/>
  <meta-data android:name="com.google.android.gms.version" android:value="@integer/google_play_services_version" />
</application>
Defining Maps on XAML
Now the only thing that is left is to define the Map like you would define any other element. Doing it through XAML will first require adding a namespace pointer inside the definition of the ContentPage that points to that NuGet package that we added. This namespace is the one that contains the Map class.
Now through this namespace (that I named maps) I will be able to access the Map class and define a map as the Content for the ContentPage. Notice that I am setting the VerticalOptions and HorizontalOptions to FillAndExpand so the map uses all the available space on screen.

Remember, this works on iOS as well (we only had to prepare that project, the XAML code is the same). And what is interesting to me is that these maps are rendered as entirely native views, and the fact that we could go to the Map and change its type to Satellite, Hybrid or street is great, because Xamarin Forms is taking care of all the stuff needed for this to work on both platforms seamlessly.
<maps:Map VerticalOptions="FillAndExpand"
          HorizontalOptions="FillAndExpand"
          MapType="Street"/>
This topic, along with many many others, is covered in greater depth in my 25-hour long "The Complete Xamarin Developer Course: iOS and Android" course, which you can practically steal from me by